First locating stickers for TrackMania and knowing where they go. All stickers will be located here
C:\Program Files\TmNationsForever\GameData\Painter\Stickers - Windows Vista.
C:\Program Files\TmNationsForever\GameData\Painter\Stickers - Windows XP(Both locations are the same for each OS.)
Each sticker will have it’s own folder with the name of your choice. Inside each sticker folder will be your sticker named Sticker.tga and it will also contain an icon for your sticker (so you will recognise it when using it in TrackMania) called Icon.dds.
We will be using PhotoShop to make your stickers and here’s how.
First you need to find what sticker you would like. I myself search here www.mobango.com. It’s a very good source for pictures and even sound for in games but that’s for another time.
First I will show you what not to do (because some people will just open with PhotoShop and save as sticker.tga, make an icon and this will be the results. Ok if you’re working on a black car but your picture may have a different colour background and we want to choose the colour of our car, not let the picture choose our car colour.

First we want to make a Alpha Channel, this will determine what part of our picture will not be seen (here it will be that black background. Notice the layer box (bottom right) and click on Channels. You have a small recycle bin (very bottom right corner) to the left of this is an Icon to create New Channel. Click this once. You work area should now look like this.
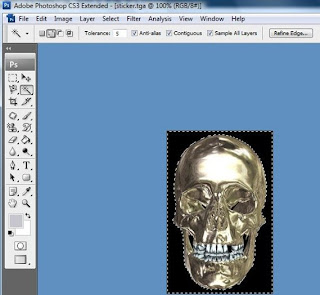
Now in the same box click on RGB. We should now see our picture again and boxes RGB, Red, Green and Blue boxes will be highlighted. Now we want to select our magic wand and click on the background area using these settings shown at top of picture below and it should now look like this.

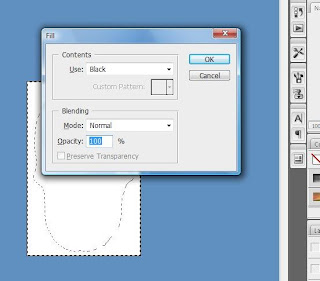
Now lets go back to the channels box and click on the Alpha channel we made so it is highlighted and press shift + F5. Using settings shown below press ok so it then fills the selected area black. Black will be transparent and white will allow whatever part of the picture is about it be shown. As for greys in the alpha channel will be semi-transparent.

Now press Shift + Ctrl + S. Change format to TGA and save as Sticker.tga to a place you wot forget. With the resolution 32 bits selected press ok.
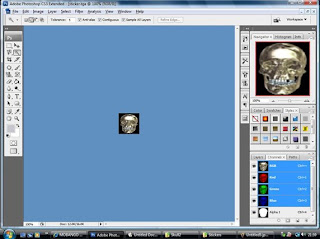
Now to make the Icon for you sticker. Press Alt + Ctrl + I. A box will pop up. In this box make sure constrain proportions is un-ticked ad change both width height in pixel dimensions to 64 ad press ok. You now have what is shown in picture below.

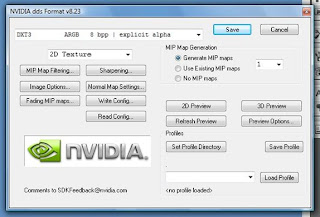
Press Shift + Ctrl + S. Select DDS format and save in the same place as sticker as Icon. Using NVIDIA settings shown below press save.

Now make a folder with your stickers name of your choice and copy your new sticker and icon files to this folder. Now copy this folder to here
C:\Program Files\TmUnitedForever\GameData\Painter\Stickers. You are now ready to go to TrackMania to paint a car and apply your new sticker.
Now when you apply your sticker it should look like this. Much better I think. Once you get the hang of this you will be doing it very quick. Good luck and have fun with your creations.
This tutorial was created and provided by Skeleton.


1 comment:
In case someone else don't have the DDS formats available in Photoshop: http://developer.nvidia.com/object/photoshop_dds_plugins.html
Post a Comment